
Erase and Reinstall macOS – Apple Silicon Mac
How to completely erase and reinstall macOS on an Apple Silicon Mac using Recovery Mode. This process wipes the entire drive and installs a fresh copy of macOS.
Note – This article covers Apple Silicon Macs only (M1, M2, M3, M4 and later). Intel Macs use a different recovery process.
When to Use This
- Reprovisioning a Mac for a new user
- Persistent macOS issues that can't be resolved with standard troubleshooting
- Preparing a Mac for return/trade-in/decommission
- Malware remediation requiring a clean install
Before You Start
- Back up any user data that needs to be preserved (Time Machine, cloud sync, manual file copy)
- Sign out of iCloud / Apple Account on the device if possible
- Know the Mac's admin password (needed during Recovery)
- Have a stable internet connection available (Wi-Fi or Ethernet)
- If using a Bluetooth keyboard/mouse, connect via USB if possible – Bluetooth devices may disconnect during the erase
Important – Erasing the disk permanently deletes all data. Verify backups are complete before proceeding.
Method 1: Erase All Content and Settings (Quick Method)
If macOS is still bootable and running macOS Monterey 12 or later, use this method first – it's faster and handles iCloud sign-out, Activation Lock, and disk erase in one step.
- Open System Settings → General → Transfer or Reset
- Click Erase All Content and Settings
- Authenticate with the admin password
- Optionally back up with Time Machine when prompted
- Review the summary of what will be erased, then click Continue
- Enter the Apple Account password to sign out of iCloud
- Click Erase All Content & Settings to confirm
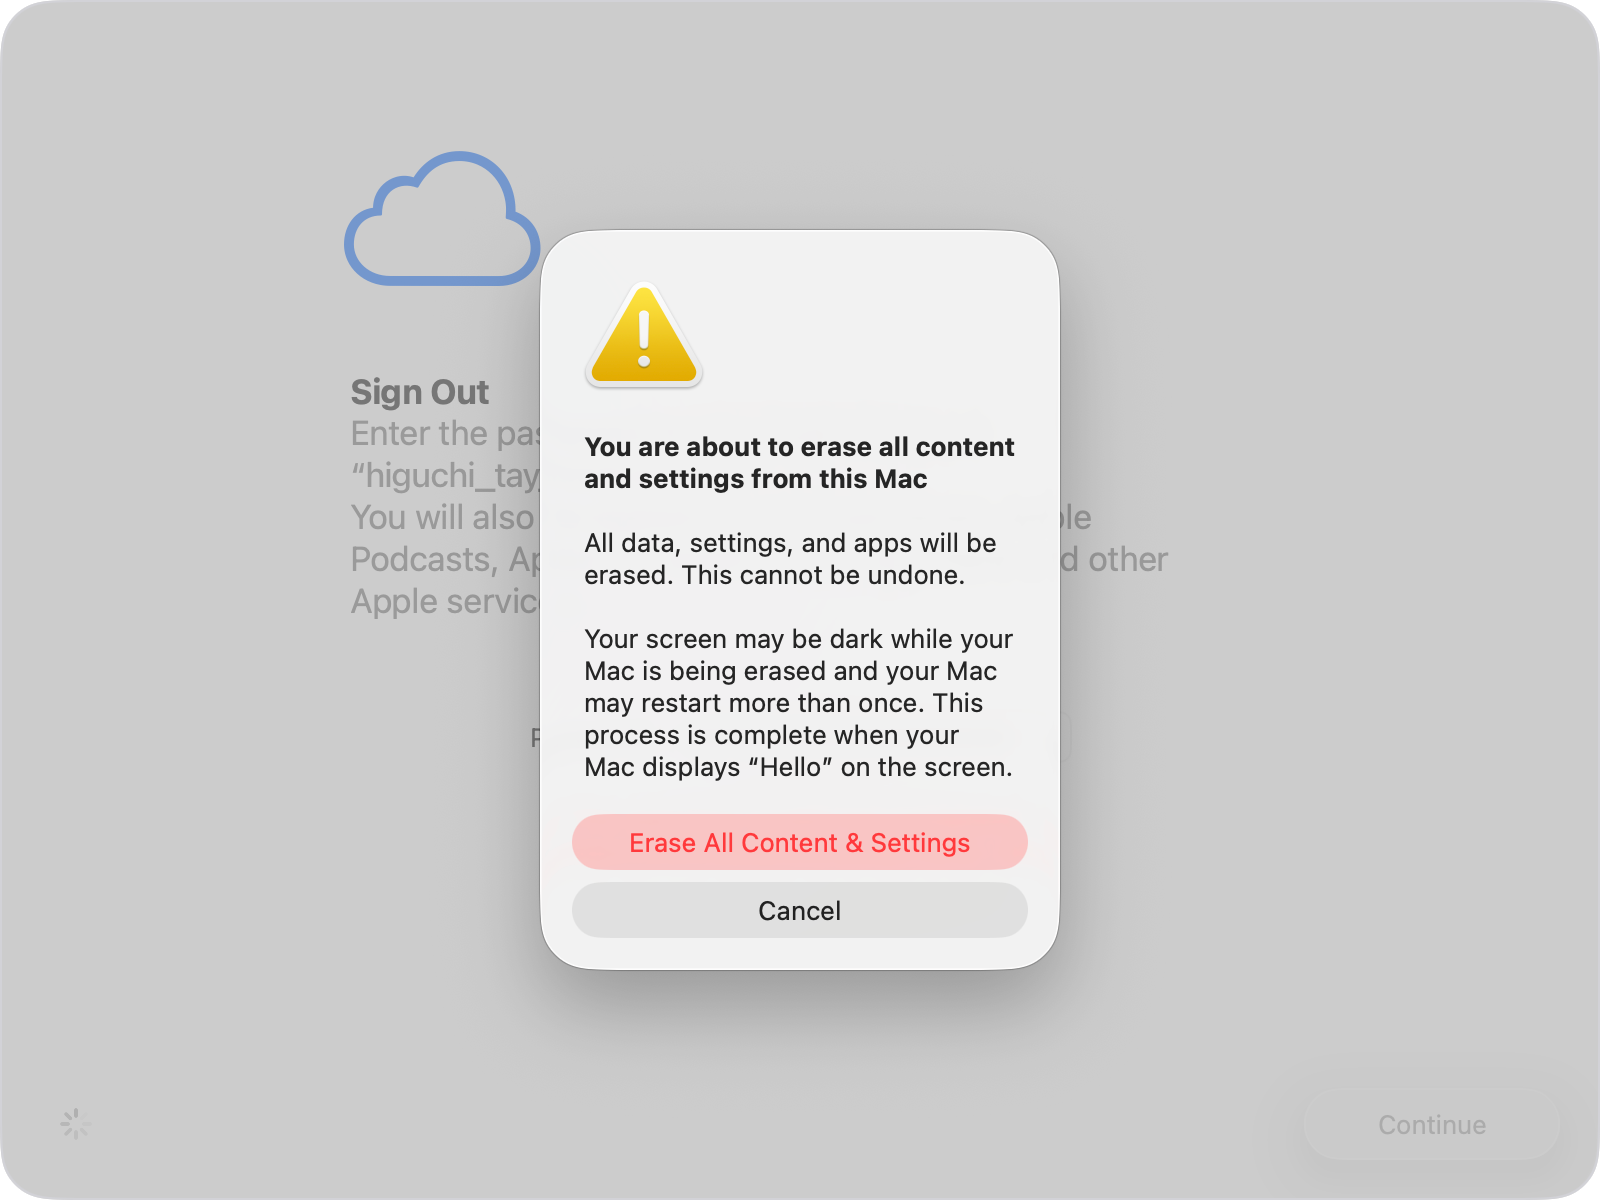
The Mac restarts, activates, and presents the Setup Assistant. If preparing for a new user, power off the Mac at the Setup Assistant screen.
Note – If macOS won't boot, or you need a full disk-level erase, skip to Method 2 below.
Method 2: Full Erase and Reinstall via Recovery Mode
Use this when macOS won't boot, when Erase All Content and Settings isn't available, or when you need a complete disk-level wipe.
Step 1 – Boot into Recovery Mode
- Shut down the Mac completely. If it won't shut down normally, press and hold the power button for up to 10 seconds until it turns off.
- Press and hold the power button (Touch ID button on laptops). Keep holding it.
- You'll see "Loading startup options" appear on screen. Keep holding until the startup options screen appears.
- Click Options, then click Continue.
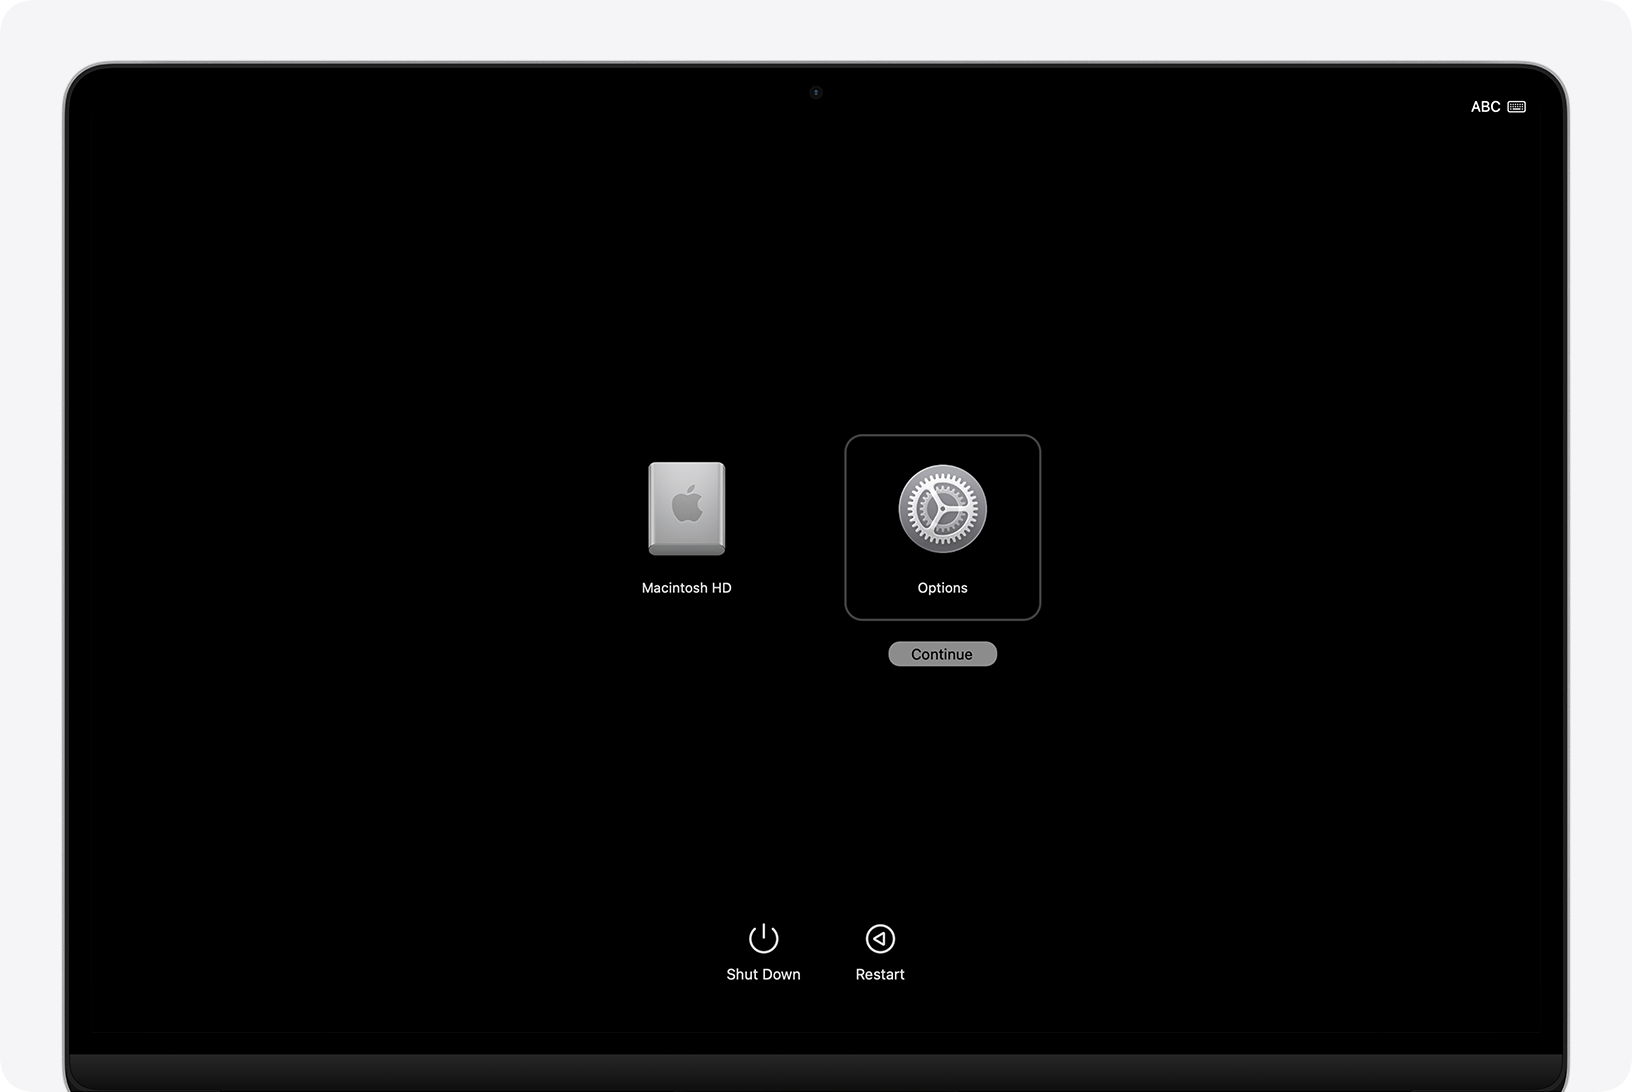
- If prompted, select the startup disk (usually Macintosh HD) and click Next.
- If prompted, select an admin user and enter their login password.
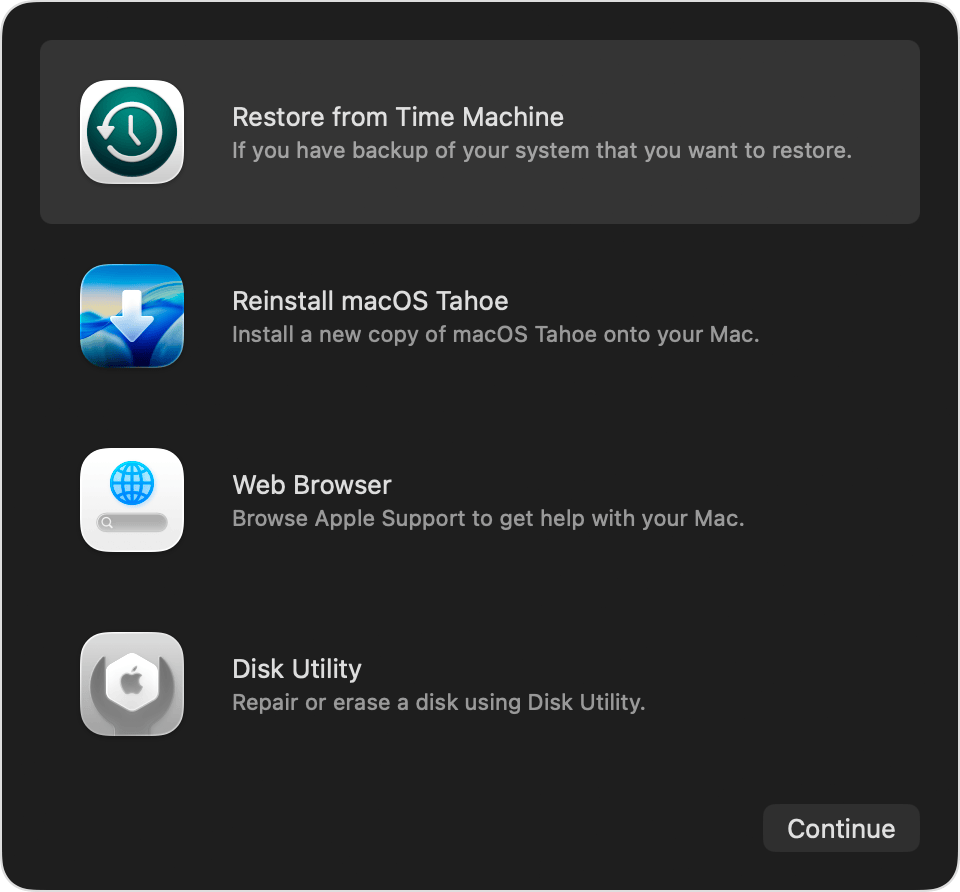
- The Recovery utilities window will appear.
Step 2 – Erase the Disk with Disk Utility
- In the Recovery utilities window, select Disk Utility and click Continue.
- In the sidebar under Internal, locate Macintosh HD.
- If there are any additional internal volumes (other than Macintosh HD and Macintosh HD - Data), select each one and click the delete volume (–) button in the toolbar to remove them. Do not delete volumes in the External or Disk Images sections.
- Select Macintosh HD in the sidebar.
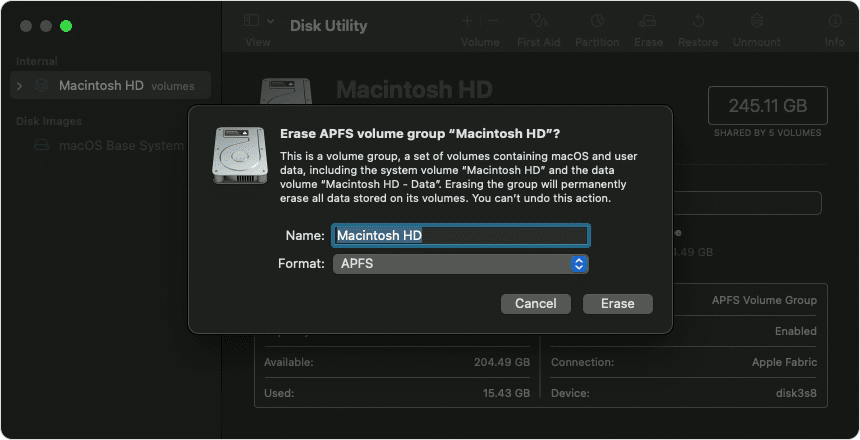
- Click the Erase button in the toolbar.
- Set the following:
- Name:
Macintosh HD - Format:
APFS
- Name:
- Click Erase Volume Group (if shown) or Erase.
- If prompted, enter Apple Account credentials.
- When asked to confirm, click Erase Mac and Restart.
- After restart, connect to Wi-Fi when prompted so the Mac can activate.
- Once activation completes, click Exit to Recovery Utilities.
Note – The Mac must connect to the internet to activate after erasing. Use the Wi-Fi icon in the menu bar or connect an Ethernet cable.
Step 3 – Reinstall macOS
- In the Recovery utilities window, select Reinstall macOS and click Continue.
- Follow the on-screen instructions. Accept the license agreement.
- When asked to select a disk, choose Macintosh HD.
- Allow the installation to complete. The Mac may restart multiple times and the screen may appear blank for extended periods – this is normal.
Note – Do not close the lid or put the Mac to sleep during installation. Keep it plugged into power.
- After installation completes, the Setup Assistant will appear. If provisioning for a new user, complete setup. If preparing for handoff, shut down the Mac at the Setup Assistant screen.
Which macOS Gets Installed?
On Apple Silicon Macs, Recovery reinstalls the current version of the most recently installed macOS. If you erased the disk after upgrading macOS, you may get the version you were running before the upgrade.
Note – There is no Internet Recovery key combination on Apple Silicon Macs like there is on Intel Macs. Apple Silicon Recovery always connects to Apple's servers when needed.
Troubleshooting
| Issue | Cause | Resolution |
|---|---|---|
| Startup options don't appear | Power button not held long enough | Shut down completely and try again – hold the power button until you see "Loading startup options" |
| Macintosh HD not visible in Disk Utility | Drive not detected | Unplug all external devices and retry. If the drive still doesn't appear, the Mac may need hardware service. |
| Erase fails in Disk Utility | Volume group issue or firmware problem | Try erasing individual volumes first, then the volume group. If it still fails, the Mac may need a DFU restore via Apple Configurator 2. |
| Activation fails after erase | No internet connection | Connect to Wi-Fi or Ethernet. Avoid captive portal networks (hotel/public Wi-Fi). Use a hotspot if needed. |
| "Erase All Content and Settings" not available | Running macOS Big Sur or earlier | Use Method 2 (Recovery Mode) instead |
| Mac shows exclamation point in circle | Firmware or system issue | Attempt a DFU restore using another Mac and Apple Configurator 2 |
| Bluetooth keyboard/mouse not working in Recovery | Bluetooth disconnected during erase | Connect the keyboard/mouse via USB. If wireless only, turn the accessory off and back on within 30 seconds. |
| Installation says "an error occurred" | Network or server issue | Ensure a stable broadband internet connection using DHCP. Try a different network. Avoid 802.1X or PPPoE connections. |
Quick Reference
| Task | Action |
|---|---|
| Boot to Recovery (Apple Silicon) | Shut down → Press and hold power button → Click Options → Continue |
| Erase All Content and Settings | System Settings → General → Transfer or Reset → Erase All Content and Settings |
| Erase disk in Recovery | Disk Utility → Select Macintosh HD → Erase → APFS → Erase Volume Group |
| Reinstall macOS | Recovery utilities → Reinstall macOS → Select Macintosh HD → Follow prompts |
| Check if Mac is Apple Silicon | Apple menu → About This Mac → Look for "Chip" (M1/M2/M3/M4) |